Last Updated on October 4, 2025
A fresh coat of paint easily transforms a room for a small amount of money. But if painted wrong, you end up with a botched job that makes the space look worse than before! Yikes! Over the last decade of owning a home, I’ve learned that painting a house is NOT as easy as it looks. Painting takes patience, preparation, and precision. Here’s my 12 newbie house painting mistakes, and the lessons I learned on how to avoid or fix. Please, learn from my mistakes….

12 Newbie House Painting Mistakes
We bought our current house about 11 years ago. Prior to that, I always rented and lived with bland white walls. BORING!
Now that I had my very own house, I was SO excited to finally choose a new paint color. And, with more enthusiasm than skill, we painted the interior of our house.
I’m fairly certain that I made all of newbie house painting mistakes – paint drips, wrong brush, wrong paint, etc..
But slowly, painting room by room, I learned proper techniques and skills to avoid a bad interior paint job. Today I’m sharing my 12 newbie house painting mistakes. May these lessons save you time, money and frustration and lead to a professional-looking paint job!
1. Don’t Skip Prep Work
I know, I know. You’re excited and chomping at the bit to start painting and transform your room into a masterpiece. I get you. But save your future self headaches, reel it in, and first do a little prep work.
Protect anything you don’t want painted. Here’s a few tips:
- Remove furniture from the room, or move to room center and cover
- Cover carpeting and hardwood floors (preferably with a canvas drop cloth)
- Cover door hardware or lighting fixtures with plastic
- Tape trim edges with painter’s tape
Prep work – don’t be lazy and just do it. Otherwise you will regret it either spill paint or find paint drips and specks in places where paint shouldn’t be.
Additional Tip
My biggest violation in the past? Not removing the light switch and outlet covers. I thought a steady hand with a paint brush would be enough. But I never got it right – either the old paint peeked through or I left paint on the cover.
In the long run, I learned it’s a good idea to remove the covers. Just be sure to keep all the screws in a safe place so you don’t spend valuable time on your hands and knees looking for them…. Yes, I speak from experience. Lesson learned.
2. Fix Blemishes
If your walls have old picture hanger holes, nicks, imperfections, take time to fill them in. Any areas with flaking or peeling paint? Lightly sand them. Cracks or gaps around molding? Apply caulk. Catch my drift?
Your goal is to create walls that are a “smooth” canvas to paint. It’s boring and tedious.
DON’T trying to fix wall blemishes by applying additional paint. The first time I painted my house, I thought a nice thick layer of paint would handle pesky cracks, and gaps. And guess what? Within a few years, they all reappeared….
3. Don’t Paint Dirty Walls
Until I painted my walls, I never noticed how much dust accumulates on walls! My solutions to clean walls, ceiling and baseboards:
- Vacuum with the brush attachment
- Wipe walls with a damp cloth and soapy water
But for some rooms, like kitchen walls with grease build-up and bathrooms with hairspray, dusting is not enough. Remove oily and sticky areas by washing the walls with warm water and squirt of Dawn dishsoap (or if the walls are really bad, try a pre-paint cleaning solution).
One of our newbie house painting mistakes? If you paint over dirty, dusty, oily walls, new paint won’t properly adhere. In a short period, the paint will chip or peel off in no time.
4. Pick the Right Paint Base
Most paints in today’s stores are water- based (also known as latex paint). But in old homes, especially those built in the early to mid 1900s, a different type of paint – oil-based paints – were a popular choice.
Did you know that painting over that older oil-based paint with the newer water -based paint will result in peeling or chipping? Apparently water-based paints don’t bond well with the naturally glossy surface of oil-based paint.
Yeah, I didn’t know that. Here’s our pantry door just 1-2 years after painting. Yup, one of my many newbie house painting mistakes…
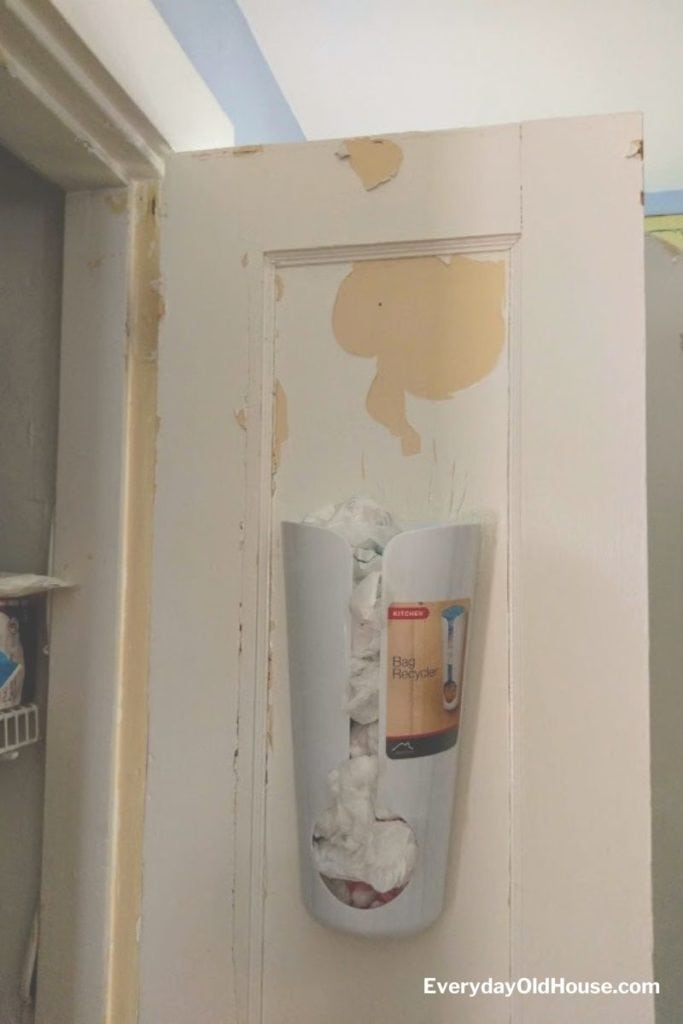
If you live in an older house, it’s a good idea to first determine oil-based or latex paint. Unsure which type of paint is already on your walls? Wipe the surface with denatured alcohol with a rag. If the rag picks up the paint, it’s water- or latex-based. No paint rubs off equals oil-based.
If you have oil-based paints, not to worry. Bob Villa has a few suggestions to prep your oil-based walls to accept latex paint.
5. Sheen Matters
Choosing the correct paint sheen, or finish, can be just as important as the right paint color hue and technique. As detailed below, sheens are suited for different types of rooms and uses.
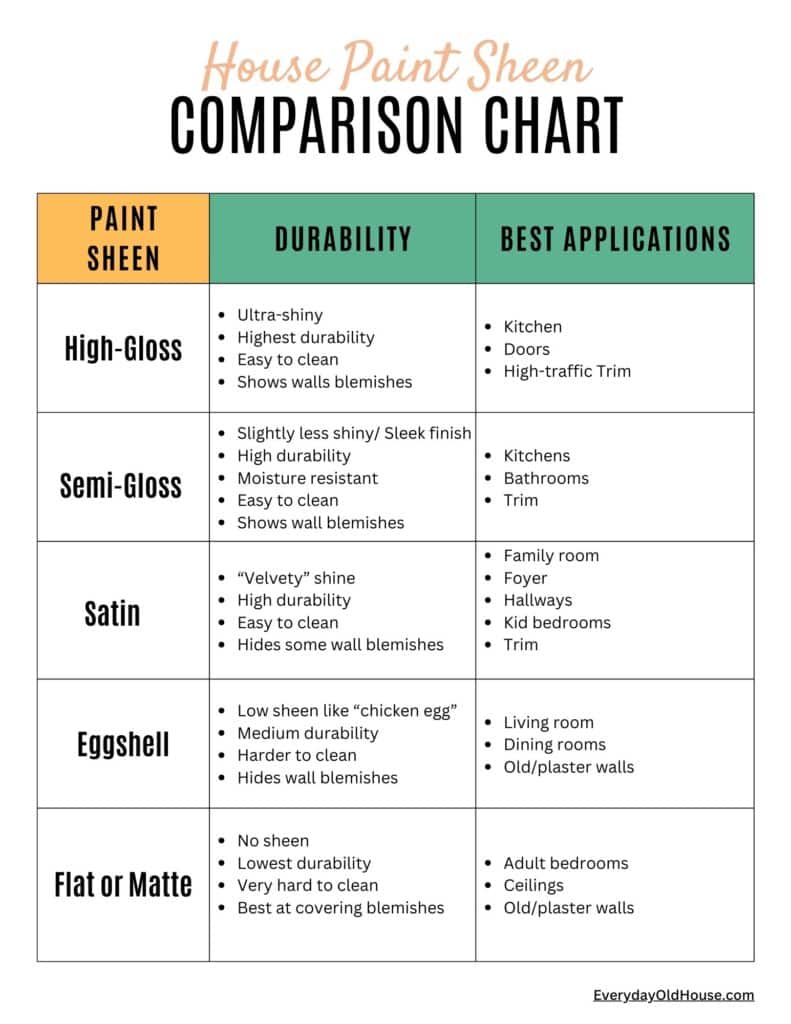
Understanding the sheen and type of paint was a HUGE lesson learned from painting our house.
We own an older (circa 1916) house with lath and plaster walls. (I’m fairly certain I’ve seen horsehair in the plaster). When we first moved into our house, we painted all the walls in a semi-gloss or satin sheens. Those sheens are meant for newer walls/ dry wall with a smooth finish. These sheens only intensified the imperfections in our old plaster walls.
Last year, we re-painted our rooms with eggshell or flat sheen. And it had made a huge impact! The walls look SO much smoother and professional.
6. Try a Paint Sample
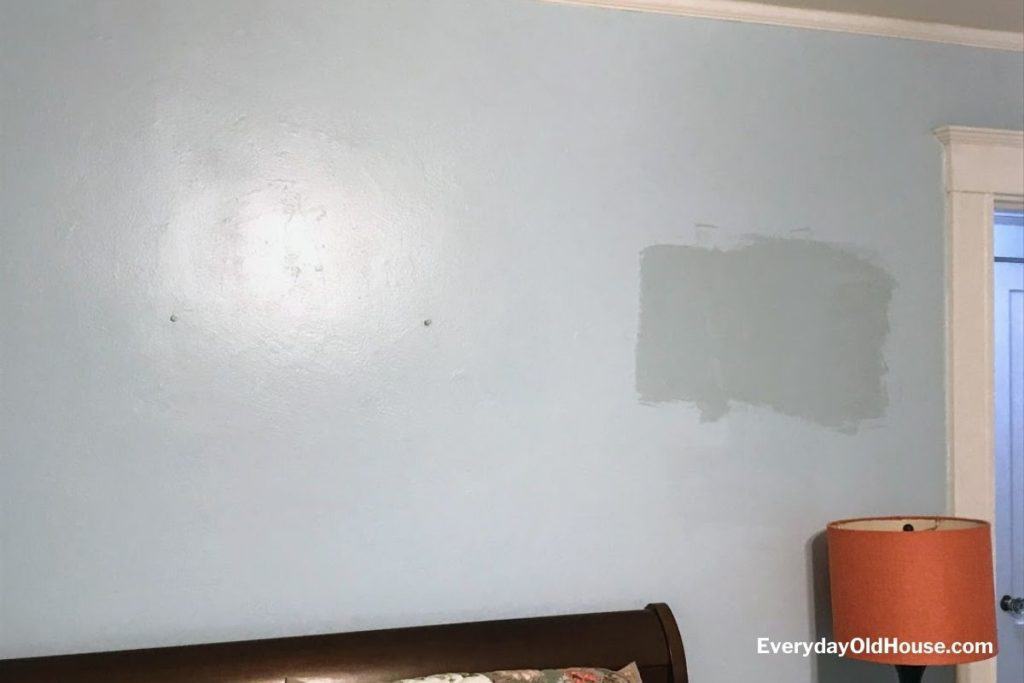
When deciding on a color hue, don’t rely on those paper color samples at the paint store. Always buy an actual sample (usually an 8-ounce jar) of paint color and apply directly to the wall. This will give you an accurate feel and helps you evaluate the paint color and sheen before shelling out money for a gallons of paint.
Live with the paint for at least 24 hours to see how the paint color reacts in different lighting at various times of the day (and night).
Paint color looks different in sunlight than incandescent or fluorescent lighting.
We recently evaluated new colors for our bedroom. We picked a beautiful shade of blue-grey from a Glidden’s paper swatch. However when we tried an actual paint color on the wall, it looked completely different. It took on a purplish hue that we did NOT like!
Additional Tip
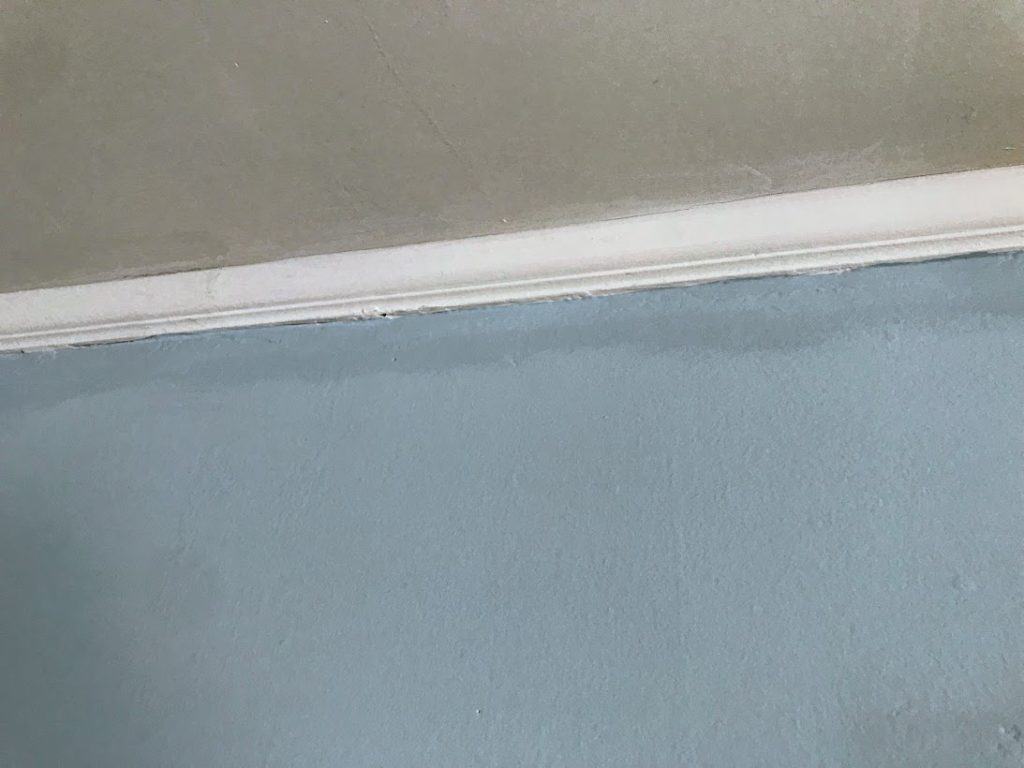
Some stores carry more than one brand of paint, but only carry sample jars in just one brand. For example, our Home Depot carries Glidden and Behr paint, but only has sample jars for Behr. The workers will happily add a Glidden color hue to that sample jar.
But from our experience, it’s NOT an exact match. Notice the color differences in the below photo? Without thinking, my husband rolled the wall paint from the Glidden gallon can, and I painted the edge up to the trim with the Behr paint tester. Grrrrr……
7. Buy the Right Equipment
There is a lot more to painting a room than just paint and a brush. You will probably need drop cloths, caulk, painter’s tape, ladder etc…. And like every DIY project, a crucial component of making it look professional is having the right equipment.
For example, buy the correct brush for your paint project. Using water-based paint? Choose a synthetic (nylon or polyester polyester) bristle brush. Using oil-based paint? Stick with a natural bristle brush. And don’t buy the cheapest brush. Invest in good brushes that will help you achieve a smooth, professional-looking paint job.
(Additional tip, a great way to paint trim is with a 1½ inch brush. No bigger. Why? It’s lighter and easier to handle than larger brushes. Your hands will get tired holding a bigger brush all day.)
Get yourself organized and save yourself multiple unneeded trips to the hardware store. Grab a printable supply list like this one printable supply list.
8. Buy Enough Paint
Admittedly, I’m a frugal person and don’t want to buy too much paint. If I can get away with only one can of paint to cover a room, I’m tempted. But I’ve learned the hard way that there is nothing worse than running out of paint at 6pm on a Sunday and finding the paint store closed.
Estimate how much paint you’ll need using a paint calculator.
9. Don’t Dunk Your Brush
Don’t treat your paint brush like an Oreo cookie with milk. Do not dunk it or completely submerge it into the paint can. Don’t even dunk it halfway. You’ll get way too much paint on the brush.
Instead, just dip the brush about 1/3rd of its length into the paint can. And then tap both sides of the brush lightly against the sides of the paint cans.
The goal is to “charge” (that’s a professional term…) a small amount of paint to the brush. Not overloading your brush minimizes the risk of drips and keeps paint brushes cleaner by not having paint drying high up on the bristles.
Using a Roller?
Similar rules apply. Don’t think that putting on a thicker layer of paint will work. A thicker layer will only result in your paint drying gloppy with drips. Also have learned not to start a roller at the bottom or top of the wall. Instead, start rolling about chest-height, then use the roller to spread paint up and down.

10. Paint by Day, Rest by Night
Painting your walls a light color with white or light colored trim? Don’t paint at night. Especially if you are, say middle-aged and your eyes aren’t what they used to be. (Of course I’m referring to a friend and not me…. 😉).
Unless you have insanely bright lighting, save the painting for daytime.
[Related rookie mistakes are painting in extreme temperatures. While I personally haven’t experienced this, I’m told that painting in low or high temps can result in a crappy paint job.]
11. One Coat is a Myth
Maybe the “one coat” primer and paint tagline is true for professional painters. But I have yet to experience this. Even when painting over a similar color (say a light yellow to a lighter yellow), we still used a second coats of the “one-coat” paint.
Not being a professional painter, it’s probably my technique. But my guess is that if you’re still reading this post, you’re an amateur painter too…. Prepare yourself to use 2 coats of paint.
And that’s at a minimum. If you are drastically changing the color, especially from dark to light, you may even need 3 coats.
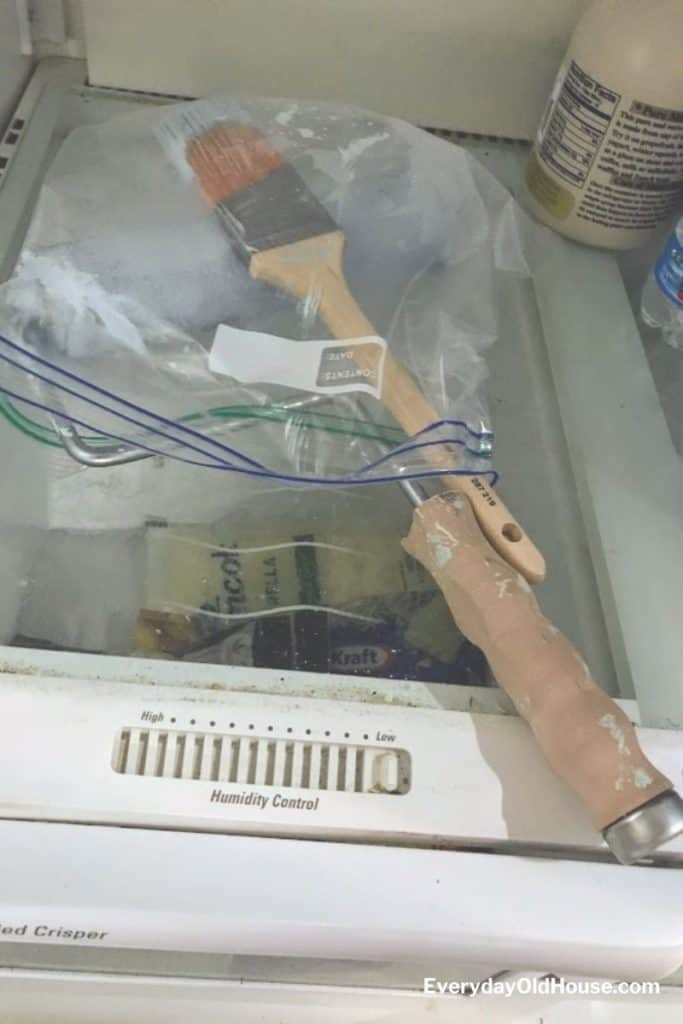
12. Keep Rollers and Brushes Wet
Normally it takes us a few days to paint. It’s a combination of 1. not being the faster people on earth and 2. raising 3 adorable monsters who love to interrupt, or worse yet, help!
Luckily, there are several great ways to keep rollers and paint brushes wet overnight. Our favorite is storing in the refrigerator a large Ziplock bag overnight. The next day I just grab the bag and get right back to painting.
So… hopefully you have learned from my rookie mistakes. My next fresh coat of paint job will be even better than the last! Best of luck with your painting project!
Do you have any newbie house painting mistakes to share from painting your house? If so, please comment below!
Related Posts


Want to be the first to know about new posts? Be sure to follow me on Pinterest, Facebook, Instagram or Twitter of even Etsy! Or better yet… Subscribe below!
My monthly (admittedly sometimes more, sometimes less….) emails are like receiving a unexpected letter from an old friend WITHOUT needing to put on your slippers and walk out to your mailbox…. See? I got ya, my friend!)
[Note: My posts are proudly connected to these amazing link parties full of DIY ideas and inspiration!]