Last Updated on January 4, 2024
Our kitchen cabinets bear the brunt of daily use. Cabinets turned dull and dingy from the accumulation of grease, spills, and food splatter. Yet well maintained kitchen cabinets can last up to an impressive 50 years! As a homeowner on a budget, I’m always looking for ways to increase the longevity of my home’s components. So I’m sharing these 7 tips on how to maintain kitchen cabinets so that we can enjoy them for years to come.
Now if you’ll excuse me, I must go implement Tip #7 below and re-distribute cans and jars in my food pantry…. ?

This post contains affiliate links, including but not limited to, Amazon Associates. As such, I earn from qualifying purchases. Full disclosure located here.
7 Tips to How to Maintain Kitchen Cabinets
Kitchen cabinets can last up to 50 years, which is quite impressive! If property maintained, they can outlast most other kitchen components, including refrigerators, appliances, counters and sinks. Which is ideal considering kitchen cabinets usually account for a significant portion of kitchen renovation cost (60-70% – Yikes!). Looking to maximize your kitchen cabinets’ lifespan? Here’s 7 tips to maintain kitchen cabinets so they can last for decades.
1. Avoid Moisture
Moisture is no friend of wooden kitchen cabinets. Kitchens are often hot and humid from cooking. Plus kitchen sinks, dishwashers and refrigerators present additional sources of moisture. And this excess moisture can cause permanent damage, such as warping of wood or discoloration to the cabinet finish.
But you can alleviate the effects of moisture on kitchen cabinets with these tips:
- Don’t drape damp dishcloths over cabinet doors (my grandma did this)
- Got a spill? Quickly wipe it up and dry wet cabinets immediately with a soft, clean cloth
- Never place damp utensils or dishes inside the cabinet (guilty as charged…. whoops). To help combat moisture inside your cabinets or drawers, consider shelf liners (grandma did this too…)
2. Consistent Cleaning
When you think about regular kitchen maintenance, you likely focus on the sink, counter, and floor. But kitchen cabinets exteriors also get dirty from cooking grease, food splatters and steam.
To keep your cabinets looking fresh and new, stay on top of the grime and crud left by food, grease and sticky fingerprints. Incorporate a wipe down of cabinet exteriors and knobs with your usual routine of cleaning the sink, counters and floors. (I know, I know, easier said than done..)
What is the quickest way to maintain kitchen cabinets and remove the bulk of grease and dirt off your exteriors? As I recently learned from testing advice from these 5 cleaning experts, mix a teaspoon of Dawn dishwashing liquid with 8 cups of warm water and wash cabinets with a soft, clean cloth (or sponge). Dawn is amazing – it’s strong enough to remove caked-on grease, yet gentle so it won’t hurt the finish.
Lastly, go over cabinets with a dry, clean cloth. As we learned above, moisture is Enemy #1 and can damage cabinets by penetrating through any cracks in the finish.
This above cleaning method won’t get all the curd, but it will slow down the build-up until you get to your seasonal deep cleaning…
3. Deep Cleaning
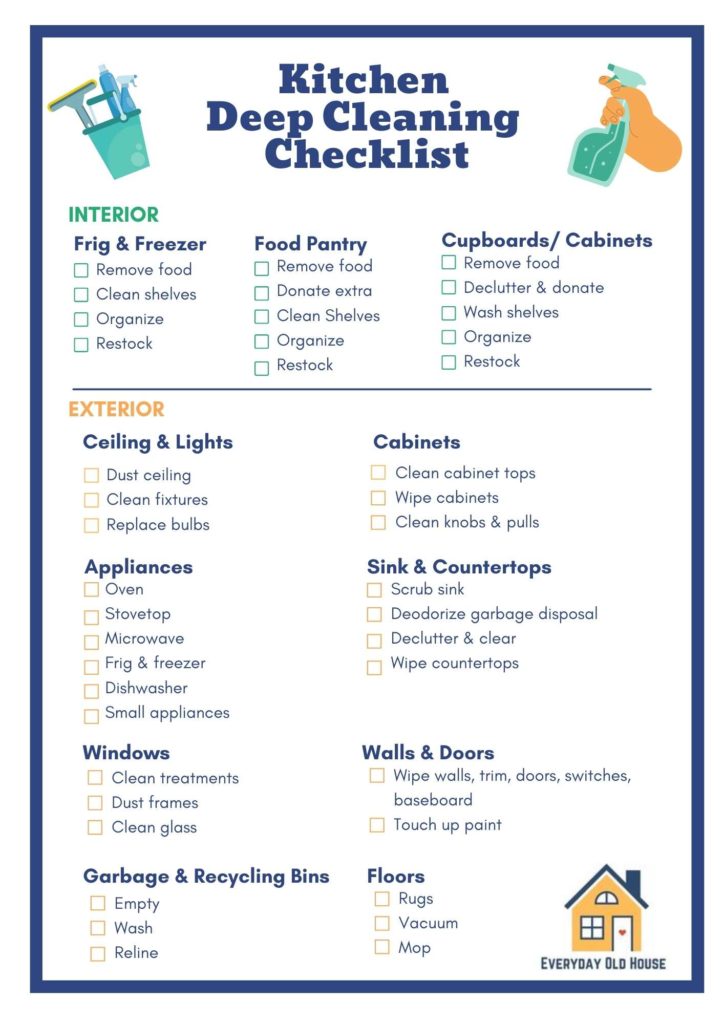
Speaking of deep cleaning…. While we might aim to stay on top of cleaning the kitchen, life (or procrastination, truth be told) gets in the way. Therefore, a few times a year, it’s recommended that you tackle a seasonal deep cleaning of your kitchen, which includes your kitchen cabinets.
This deep cleaning checklist tackles all the tasks needed to thoroughly clean the inside and outside of your kitchen cabinets. And keeps your motivated and focused to clean (’cause cleaning is so much fun, am I right? ?)
For the interiors, a deep clean consists of several steps:
- Emptying and decluttering items
- Cleaning (including the crevices)
- Organizing
- Restocking remaining items
Moving onto the cabinet exterior, a deep (yet gentle) scrub will remove the accumulated grime, grease droplets and layers of food that make them look dingy and dull. There are a variety of tips to deep clean your cabinets and revitalize the beauty of your cabinet’s wood grain and shine, including:
- Spend extra time on decorative trim with crevices
- Scrub with an old toothbrush to get in the corners and small crevices.
- Spot clean the grimiest of areas with baking soda, toothpaste or citrus cleaner
- Don’t drench cabinets and hardware (moisture is Enemy #1!). Your washing cloth should be wet, but not soaked. Squeeze out excess water.
- Don’t forget to open doors and drawers to wash around the frame.
- For knobs, pulls and hinges, determine the best cleaning method for their particular finish.
4. Avoid Harsh Cleaners
Wood cabinets are finished with varnishes and lacquers that protect the underlying wood. Therefore avoid cleaning anything that will scratch or strip the finish from the cabinets, leaving the wood underneath exposed.
Instead, use gently but strong cleaners like Dawn dish washing liquid or Murphy’s Oil Soap. And on super grimy and sticky spots, while it’s tempting to use an abrasive pad, don’t. Just don’t. That could dull or scratch the finish of your cabinets. With a bit of elbow grease, patience and determination, these cleaners should remove all, if not most, of the grease and crud on your cabinets.
Here’s what should you avoid when cleaning your kitchen cabinets:
- Scouring pads, steel wool and brushes (leave these for pots and pans)
- Strong detergents and abrasive cleaning products
- Solvent- or petroleum-based cleaners like mineral spirits, paint thinner and or nail-polish removers
- Ammonia or bleach. Since ammonia is a common ingredient in glass cleaners, shield the wood parts when cleaning glass inserts
5. Put Down the Wax
Just because your cabinets are wood doesn’t necessarily mean they need polishing, waxing, or oiling. Check your owner’s manual or reach out to your kitchen cabinet manufacturer to understand their recommended instructions with regards to waxing and polishing.
Some waxes and polishes (especially silicone-based) can build up on cabinet surfaces and do the opposite of what you desire. Instead of bringing out the shine, certain waxes and oils accumulate and leave a dull, hazy look. And that leaves you with the added task of removing wax build up from your cabinets. Which apparently is quite difficult!
6. Treat Cabinets Gently
Quick poll – how many of you unintentionally slam your kitchen cabinet doors and drawers while focused on cooking or packing lunches for school or work the following day?
Yeah I thought so. Me too. It’s not intentional. Just part and parcel of using our kitchens every day, right? (Back me up here…).
Kitchen cabinets bear daily abuse, especially ones without soft-close mechanisms. Usually we
don’t even realize we are slamming the cabinets and drawers since they don’t make a horribly loud sound. Over time this forcefulness can lead to dings and damaged kitchen cabinets.
To dampen these blows to kitchen cabinets, consider these tips:
- Install soft close cabinet door dampers to diminish the blow to your kitchen cabinet doors
- Add hardware with handles
- Add cabinet doors to the “no slamming door” policy in your house
- Open drawers with roll-out hardware partially rather than fully to reduce strain on hardware
7. Use Cabinets Appropriately
Speaking of strain, kitchen cabinets are designed to carry up to a certain weight. But many homeowners (including yours truly) maximize cabinet and drawer space by shoving way too many things into their kitchen cabinets.
Each cabinet and drawer can take hold a limited amount of weight. Cram too much in your cabinets will cause cabinets to sag over time, which is impossible to fix. Plus, heavy weight weakens hinges and roll-our hardware to the point of breakage.
How can you use your cabinets appropriately and extend their lifespan?
- Declutter! Lessen the weight imposed on cabinets by donating or throwing away broken, expired, or unused items.
- Don’t overstuff or cram items in cabinet
- Store smaller items (utensils, dishes and cups) in upper cabinets and drawers, and larger, heavy cookware (pots and pans) in bottom cabinets
- Ease up on food pantry units, especially multi-shelved tall units and Lazy Susans. Avoid stacking cans, jars and heavy food packages. (whoopsy…..that’s my bad…) Distribute weight throughout the cabinets
Related Posts
Want to be the first to know about new posts? Be sure to follow me on Pinterest, Facebook, Instagram or Twitter of even Etsy! Or better yet… Subscribe below!
My monthly (admittedly sometimes more, sometimes less….) emails are like receiving a unexpected letter from an old friend WITHOUT needing to put on your slippers and walk out to your mailbox…. See? I got ya, my friend!)
[Note: My posts are proudly connected to these amazing link parties full of DIY ideas and inspiration!]


