Last Updated on October 4, 2025
Let’s be honest. Deep cleaning the kitchen isn’t exactly anyone’s idea of fun. But it’s a necessary chore that needs to be done. And to make it as painless as possible (and potentially fun – GASP!) this Kitchen Deep Cleaning Checklist will help you efficiently and effectively tackle built-up grime and grease. Make your kitchen sparkle again!
This post contains affiliate links, including but not limited to, Amazon Associates. As such, I earn from qualifying purchases. Full disclosure located here.
WHAT’S SO GREAT ABOUT THIS CHECKLIST?
With 3 young kids and a “super-shedder” dog, my house gets disgustingly dirt – fast. It’s hard to find time (and motivation) to clean. But once in awhile I’ll tackle a deep clean of my kitchen. And it goes A LOT easier and faster when I use this Kitchen Deep Clean Checklist.
What do I like about most this step-by-step checklist?
1. FLEXIBILITY
This Kitchen Deep Cleaning Checklist breaks down the whole process for you section by section. If you’re an overachiever (if so, God Bless), use this checklist to tackle your kitchen all at once. Or you can work through the checklist a little at a time, in between that pesky disruption called, you know, life?
Ideally, this step-by-step cleaning checklist is perfect for two sessions. Once session for cleaning the interior of your kitchen (i.e. frig, food pantry, etc.), the other session for the exterior (i.e. cabinet doors, sink, floors, etc.). Perfect for cleaning the interior on a Saturday, the exterior on the Sunday.
2. ELECTRONIC
Don’t like to print checklists? Prefer electronic version? Well, you are in luck! This checklist is also available in Microsoft Excel and Google Docs.
To receive the electronic version, just send me an email at everyday old house over at gmail and I’ll reply ASAP with your preferred version. Note that I’m a one-woman show so it may take me 1-2 days to respond. And also let me know if interested to join my email list (I sporadically email once a month…)
PREPPING FOR KITCHEN DEEP CLEANING
Admittedly, it might seem weird to “clean before you clean”. But this “pre-cleaning” will help you deep clean your kitchen faster and minimize frustration. So before you roll up your sleeves, get yourself organized by doing the following:
- Declutter: Clear off countertops by recycling no longer needed paper, and storing rarely used items.
- Dishes: Wash, dry, and put away dirty dishes
- Trash bag: Grab a trash bag or donation box
- Supplies: Gather cleaning supplies
Oh, and one more thing to remember when deep cleaning the kitchen….
HAVE FUN!
Or at least try? ? Kitchen deep cleaning is a chore, no matter how you look at it. BUT there are ways to make a bit more palatable. For example:
- Enlist Help: Bribe the family with a pizza and/or movie night in exchange for an extra set of hands to get the job done faster.
- Entertain Yourself: Turn up your favorite tunes (I love 80s dance music), podcast or audiobook
- Treat Yourself: Schedule a pedicure, eat an extra dessert, watch a movie. Do a little something to keep yourself motivated to complete the checklist and celebrate the win of a freshly cleaned kitchen.
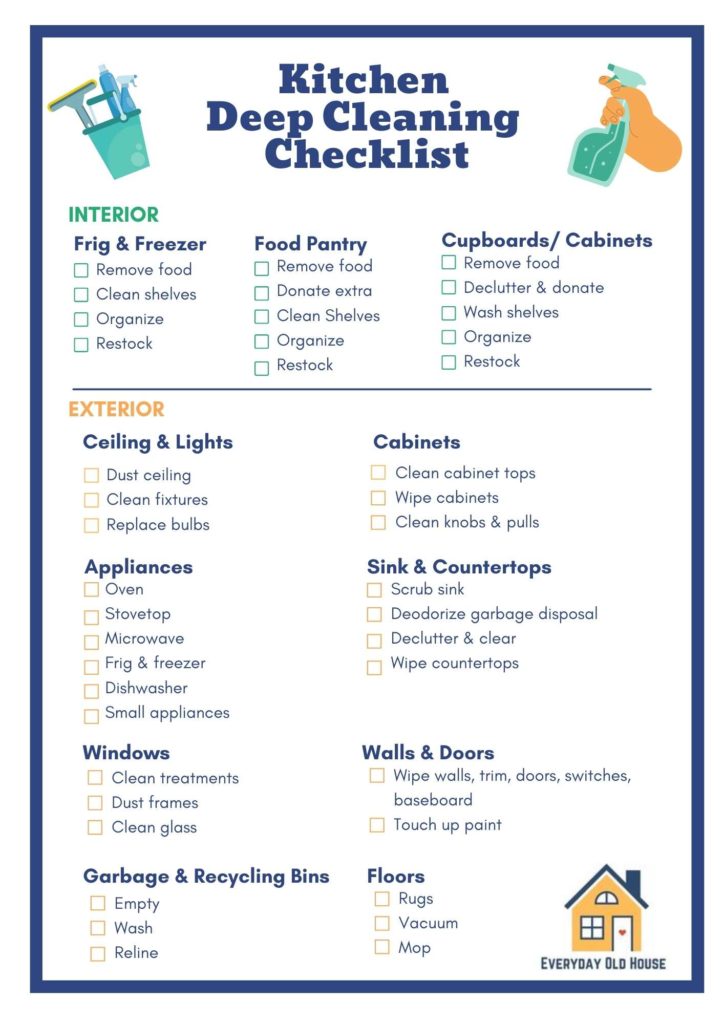
KITCHEN DEEP CLEANING CHECKLIST
Now onto the checklist. As mentioned above, this checklist separates cleaning the interior with the exterior parts of the kitchen. You are welcome to tackle this checklist in a whole day. Or in bite-sized pieces.
The download is at the bottom of this post. While there is TONS of great tips and tricks in the sections below, I get that sometimes you just want to head straight to the checklist. Click HERE for immediate access.
As you scroll to the end of the post to get this Kitchen Deep Clean Checklist, read through the tips below to stay focused and effectively deep clean!
Now let’s go deep clean the kitchen!
1. INTERIOR
This first section dives into the areas behind the scenes – food inside the refrigerator, freezer, and pantry, and cooking supplies behind all those cabinet doors.
REFRIGERATOR & FREEZER
Refrigerators easily get cluttered (in my house, especially with expired food) and bear the brunt of spills constant use.
- Empty: Remove all food, and discard items that are moldy, expired, inedible, empty, etc… Some folks like to empty the entire frig or freezer at once, others like to clean shelf by shelf.
- Shelves: Wash shelves and interior parts of the frig and freezer with soapy water or food-safe cleaner. Get in corners and crevices.
- Produce Shelves: If removable, take them out, empty and wash.
- Organize: Take a moment to think about how best to organize storage. What’s working and what’s not? Have you installed the re-adjustable shelves in the best spot for storing food? Do you need shelf liners in the product shelves? Are the kids’ yogurts stored too high (i.e. inaccessible) and need to be brought down to a lower shelf?
- Restock: Once the shelves are dry, put food back into frig and freezer. Arrange and group food items by type, with food with the closest expiration dates towards the front of the fridge.
FOOD PANTRY
After you have tackled the refrigerator and freezer, continue with the “food storage” theme by tackling your food pantry. The process for organizing your food pantry is similar to the refrigerator. Cleaning isn’t exactly rocket science….
- Empty: Remove all food, and discard items that are moldy, expired, inedible, empty, etc…
- Donate: For unopened, nonperishable items that you don’t plan to use but haven’t expired, place in donation box or bag or box.
- Shelves: Vacuum or wash shelves with soapy water or food-safe cleaner.
- Organize: Take a moment to think about the best way to declutter and organize storage. Are the cereals that you eat every morning stored in a top shelf, yet your rarely used baking good are eye level? Would investing in airtight containers help cooking staples from going stale?
- Restock: Once the shelves are dry, return food back to shelves. Arrange and group food items by type, with food with the closest expiration dates towards the front of the fridge.
CABINETS & CUPBOARDS
Now that we have the food storage decluttered and organized, the next step is to clean, declutter and organize baking and cooking supplies in your kitchen cabinets, cupboards, Lazy Susans and drawers.
- Empty: Remove items from cupboards and place on countertop or kitchen table.
- Clean: Vacuum or wipe down all shelves with soapy water or kitchen cleaner. Get into corners and crevices. Wash any drawer organizers
- Declutter & Donate: Throw away items that are broken. Place unwanted items or items that you haven’t used in a few years (but still in working condition) in donation box.
- Organize: Does your cabinet set-up make sense? Are they organized in a way to maximize storage and ease of use? (I feel this like question needs a whole other post to address…..) Do you have the storage organizers that fit your needs? Would installing shelf liners protect your cabinets (I love this liner under my kitchen sink that stopped damage from a leak)
- Restock: Group items together as it makes sense. Return them to cabinets and drawers, with the most frequently used most accessible. For example, store rarely used seasonal items on a less accessible top shelf or in the back of a cabinet.
2. EXTERIOR
Now that the interior of your kitchen is spotless and organized, it’s time to shift to the exterior (with exception of cleaning inside remaining appliances). The best way is to start cleaning from the top and work your way down. This helps avoid dirt, dust and random gunk from falling onto already cleaned surfaces.
CEILING & LIGHT FIXTURES
Perhaps it’s just my house, but my light fixtures are magnets for dust and grime. Caked on dirt, grime and grease (how does grease even get up that far!?!?!) It’s amazing we can even see at night!
- Ceiling: Dust cobwebs from ceiling using a broom or Swiffer with a dry cloth
- Lightbulbs: Replace blown bulbs (ensure light is off and bulbs are cool)
- Fixtures: Vacuum or wipe light fixtures, fans, and remaining bulbs. Clean fans using this pillowcase hack.
CABINETS
If your cabinets stop a few inches short of the ceiling start with this cleaning procedure:
- Remove: Pull down all items.
- Vacuum: Using a hand-held vacuum or brush attachment, remove cobwebs and dust
- Wipe: Spray with cleaner and scrub to remove any sticky residue.
- Line: To help future cleaning, line cabinets tops with wax paper or wrapping paper. Next time you’ll save time cleaning by just rolling up the paper! (got to love that…)
- Replace: Clean and return (declutter) items to cabinet top
Next work your way down to the cabinet and cupboard doors.
- Wash: Working from top down, wipe cabinet doors using 5 Ways to Clean Kitchen Cabinets). For especially dirty spots or hard to reach places (e.g. corners), scrub with an old toothbrush.
- Knobs: If you want to get knobs and pulls especially clean, remove and soak using this unconventional method.
APPLIANCES
Appliances are the workhorses of your kitchen. And if you haven’t done a kitchen deep cleaning in awhile, probably show it (no offense…) on the inside and out. Besides cleaning, now’s the perfect time to examine your appliances and evaluate whether or not it’s time to start saving for replacements with this budgeting tool.
- Oven: Run the self-cleaning cycle of your oven per manufacturer’s instructions. Wipe down exterior and polish (if applicable).
- Stovetop: Scrub per manufacturer’s instructions and polish (if applicable)
- Microwave: Clean inside (I love my Angry Momma) and wipe the outside
- Frig & Freezer: Wipe down fridge exterior, especially the handles (ours get incredibly sticky). Remove excess magnets and old papers. If there’s no chance of hurting yourself, shimmy unit away from the wall and then vacuum the coils.
- Dishwasher: The inside is already clean, but the exterior needs to be wiped and polished (if applicable)
- Other Small Appliances: Clean inside and outside of toaster, coffee maker, etc.
SINKS & COUNTERTOPS
Time to clean those hardworking surfaces of your kitchen. Your sink and countertops are in constant contact with food, so it’s important they receive a good deep cleaning from time to time.
1. Sinks & Garbage Disposal
- Scrub: Using appropriate cleaner, scrub the entire sink from the top to the bottom. If you have a porcelain sink with scuff marks, use this method. After scrubbing, rinse with water until water is clear.
- Deodorize: To fight odor, run the garbage disposal with either disposal tablets or cut up lemons to freshen up the disposal. Ensure splash guard has a good seal.
2. Countertops & Backsplash
- Declutter: Do you really need all that stuff on your countertops? Recycle extra papers, store small appliances you rarely use, etc.
- Clear: For those items that will remain post deep cleaning, remove from countertops – small appliances, knife blocks, dish drainer, cannister sets
- Wipe: Clean countertops and backsplash with kitchen cleaner, taking extra time in the corners and grout. For added cleaning power on tough spots (e.g. edge where counter touches the sink), spot clean with a toothbrush and warm soapy water.
- Specialty Care: Certain countertops (e.g. granite) need additional cleaning and/or sealing as recommended by manufacturer
- Restock: Once dry, return items to their place on the countertop
WINDOWS
If you are going to torture yourself deep cleaning your kitchen, don’t you want the sun will shine through and let that newly clean kitchen sparkle even more?
- Treatments: Remove and wash (or dry clean) any curtains. Dust any blinds or shades.
- Frames: Either using a dust cloth or the brush attachment on your vacuum, remove the dust and dirt around the window frames.
- Glass: Wash windows using these 25+ tips from the experts
WALLS & DOORS
Your kitchen walls and doors are the most forgotten place during a kitchen deep cleaning. But dust, cobwebs, dirt and grime build up here too, so it needs a little love. Remember to work from the top down and from one side of the room to another.
- Wipe: Using a soft cloth and warm soapy water, wash walls, trim, doors, doorknobs, light switches, and baseboards.
- Paint: Feeling like an overachiever? Touch up scratches and dings.
GARBAGE CAN & RECYCLING BINS
In my house the garbage can gets gross SO fast. Not sure how it does, but it does…
- Empty: Remove content
- Wash: Using a hose, or throwing it in the bathtub, scrub. If bins are stored inside a cabinet, clean the cabinet walls
- Reline: Once dry, install garbage bag
FLOORING
You’re SO close to the finish line! The very last step of this Kitchen Deep Cleaning Checklist? Cleaning the floor!
- Rugs: Roll up any throw rugs, shake them outside and if necessary, wash.
- Furniture: If you have chairs or moveable furniture (small island or bar cart on wheels), move to another room.
- Vacuum: Remove crumbs by sweeping or vacuuming. Give extra attention to corners where crumbs and random gunk accumulate.
- Mop: Get that floor sparkling with a heavy-duty cleaner (for wood floors, I prefer Murphy Oil Soap).
KITCHEN DEEP CLEANING CHECKLIST DOWNLOAD
Wrapping Up
Whew! All done!! Doesn’t it feel great? Feel accomplished? When you break it down into sections like this Kitchen Deep Cleaning Checklist, doesn’t it seem easier and faster? Celebrate the victory!
Related Posts


Want to be the first to know about new posts? Be sure to follow me on Pinterest, Facebook, Instagram or Twitter of even Etsy! Or better yet… Subscribe below!
My monthly (admittedly sometimes more, sometimes less….) emails are like receiving a unexpected letter from an old friend WITHOUT needing to put on your slippers and walk out to your mailbox…. See? I got ya, my friend!)
[Note: My posts are proudly connected to these amazing link parties full of DIY ideas and inspiration!]