Last Updated on March 22, 2024
Itching to grab those house keys at closing, unlock the door to the home of your dreams and start unloading that moving truck? While I appreciate (and share) your enthusiasm, you probably should consider deep cleaning your home first. Get rid of all that old dirt first – make your home shiny and new! And I’ll help you get it squeaky clean with a Printable Move-In Cleaning Checklist.

Moving Into Our New Old House
A few years ago, I was in your shoes. My husband, my 6-week old daughter and I moved from our apartment into a slightly larger 100+ year old Foursquare style house.
And it was one of the proudest days of my life. Almost 15 years of saving money while living in rundown apartments to save that 20% down payment for my first house.
I was chomping at the bit to unload, unpack and start my new life. But the first night was meant to be savored and celebrated. (If you need ideas, check out these 10 Fun Ways to Celebrate the First Night in a New Home).
And to help ensure that first night goes smoothly without spending time and effort digging through boxes to find the toilet paper, we planned ahead with this printable checklist with 40+ essentials for a first night in an new house (click image below for download).
And the next day, we cleaned. The last owners were good people, but they were focused on their new house and not on cleaning out the house they were passing on to us.
So the next day, before you unpack , make time to give your new place a good scrub and a deep clean. Doing this deep cleaning will (literally) wipe the slate clean. Don’t you and your new home deserve a fresh new start?
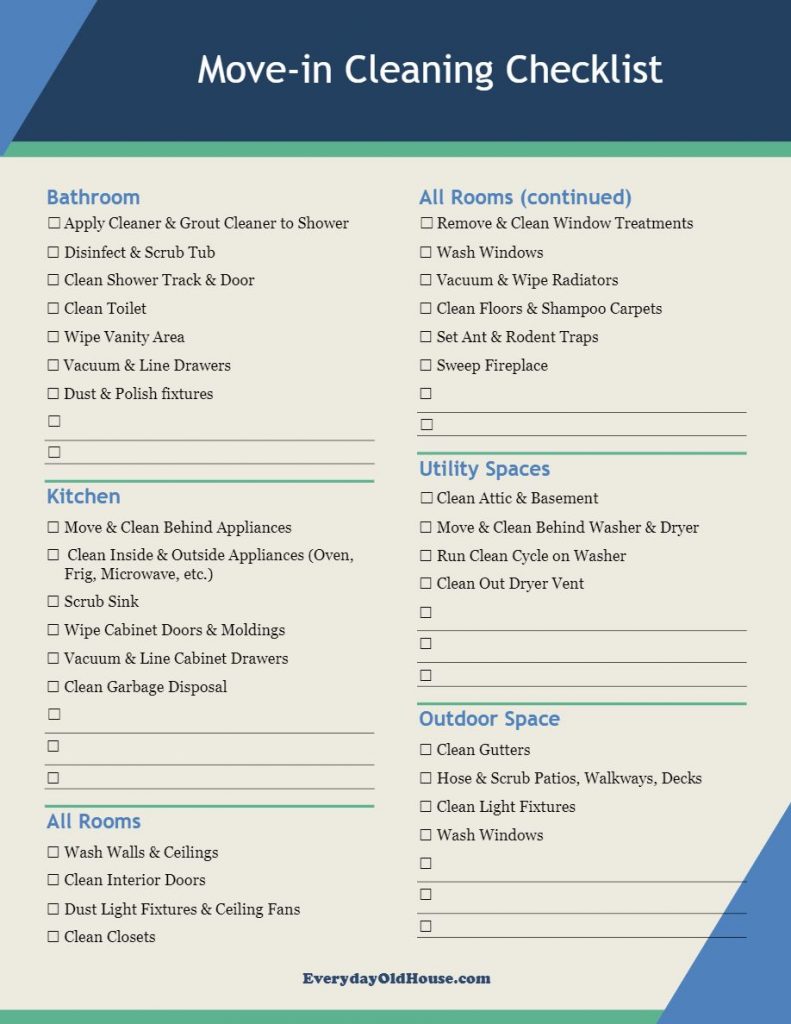
Printable Move-in Cleaning Checklist
Not sure where to start? Feeling overwhelmed? That’s exactly how I felt. But if you know me, then you know that I’m a list girl. Always making lists. Grocery lists. Christmas presents list. To-do list. Bucket list. Having checklists gives me the feeling of being in control.
So I developed a Move-in Cleaning Checklist when it came time to deep clean our new home. And I’m passing it on to you.
Use this checklist as a tool to systematically remove the dirt and grime accumulated from past owners. Make your new old house shine again!
I’ll admit my checklist is not overly complicated. It’s a plain document (originally a Word document). There are no fancy images. No snazzy color.
But do you really need a fancy-smancy list? Nope.
What do you really need? A simple yet comprehensive checklist that applies to all your living spaces. And if I forgot something, this checklist has empty spaces so you can tailor it to your specific needs.
OH! And you know what else you need? Tips and tricks from cleaning experts. Be sure to keep reading after the download. I’ve included links to tips, tricks and deep cleaning tutorials from over 25 cleaning experts!

General Move-In Cleaning Tips
Before we dive into the checklist section by section, here’s a few general tips to help ease your cleaning tasks.
- Take your time. Do a deep cleaning before you unpack or move in any furniture. It’s sooooo much easier to clean an empty house.
- Follow the checklist in order and start with these two rooms first
- Bathroom— Trust me, you gonna need this room immediately after moving in, so start here. If you are blessed to have more than one full bathroom, you only have to clean one immediately. If curious about which cleaner to use to tackle the bathroom, check out my experiment on DIY versus Store-bought bathroom products to see which was most effective.
- Kitchen— After a week (or two) of take-out food while packing up our apartment, I was ready to cook in our new house ASAP. So as soon as you are done with the bathroom, clean the kitchen.
- Have all your cleaning supplies ready to go. The last thing you want is to stop cleaning and run to the store.
- Enlist help – partners, family, friends. Your loved ones want to support you in this endeavor. Take this opportunity to use their help. Promise some snacks, drinks, and turn on some great upbeat tunes to keep them (and you) motivated!
Move-in Priority To-Do Checklist
There is SO much to do when moving into a new home, besides cleaning. It’s so hard not to feel overwhelmed. To help you tackle moving into a new home, I’ve also created this free Move-In Priority To-Do Checklist. This checklist lists about a dozen essential things you should do within the first week of moving into your new home.
Moving During Covid-19?
If you are moving during the pandemic, be sure to check out Rocket Homes Guide to Moving During the Corona Virus. And have a safe move!
1. Bathroom
Apply Tile & Grout Cleaner to Shower
I hate grout. It’s so hard to keep white! And there’s a good chance your new “old” shower and tub doesn’t have the squeakiest clean tile and grout.
So how do you get it clean? Check out Bren Did’s experiment with the 10 most popular DIY grout cleaners online to determine that a combination of hydrogen peroxide and baking soda best cleaned grout. In addition to what cleaners were most effective, Bren also had a few tips to get the most from your grout cleaner:
- Give the grout cleaner some dwell time. Let the cleaner sit on the surface for 5-10 minutes before scrubbing.
- Use a small, firm brush to scrub grout lines. The best kind of small brush? A cheap toothbrush.
Disinfect & Scrub Shower
Tubs and showers come in a variety of materials, each with different recommended cleaning methods. If you don’t know that material your tub is made of, Hunker has a great article on How to Figure Out What Your Bathtub is Made Of. Once you know the tub’s composition, you can then determine the best way to clean.
For general tub and shower cleaning tips, check out the team over at One Crazy House with 13 Cures for Impossibly Dirty Tubs.
Don’t forget and soap dishes or racks!
Clean Shower Track & Door
Only some tubs have shower tracks and doors, so this task on this move-in cleaning checklist might not apply. But shower door tracks are pretty easy to overlook, so I purposely called this out as a cleaning task. Merry Maids recommends 2 different ways to easily remove all the gunk in those tracks.
Clean Toilet
This chore is probably one of my least favorite on this move-in checklist. And probably yours too. Domestic Goddess Martha Stewart gets into the nitty-gritty of cleaning the inside, outside and tackling stubborn stains and rings in The Ultimate Guide to Cleaning a Toilet.
Some folks are skeeved out by sitting on a toilet seat used by a previous owner and buy a new seat. And honestly, I can’t blame them. Personally, the toilets in our house weren’t that old so I was OK with keeping our seats after a good cleaning.
Wipe Vanity Area
Vanity countertops can quickly become mottled with water drips and soap residue. And this can build up for those homeowners who don’t stay on top of the upkeep, especially those with hard water. Wipe down the vanity with a damp sponge or cloth to keep them looking their best. Sara at Bitz & Giggles recommends an easy DIY solution using vinegar to tackle those hard water spots.
Vacuum & Line Vanity Drawers
Bathroom cabinets are magnets for dust and gunk (think squeezed toothpaste tubes). For this move-in checklist task be sure to vacuum all the loose dirt and then wipe with a wet cloth, followed by a dry with a clean cloth.
To avoid gunky drawers I personally like Diane from In My Own Style’s method of using gift wrap and Serena’s from Thrift Diving DIY drawers using pretty scrapbook paper.

Polish Fixtures
Sink faucets, towel racks, and other bathroom fixtures start shiny and pretty, but with constant use, they can quickly turn dull. It’s hard to keep them shiny – with your family constantly washing their hands and splashing soap and leaving water spots.
Hardware come in a variety of metals – brass, chrome, stainless steel, chrome, so I hesitate to give specific cleaning instructions for fear of causing damage. But Modern Bathroom, based in Southern California has a series of tips on How to Polish Your Bathrooms Fixtures.
2. Kitchen
Move & Clean Behind Appliances
First cleaning task in the kitchen for this move-in cleaning checklist is cleaning behind all moveable appliances. Commonly that is the refrigerator and stove. Of course this assumes that the previous owners left you these appliances. But even if they took their appliances with them, they probably left a less than clean area.
Why is it important to deep clean behind the refrigerator? Not only is it a commonly dirty area, but it can also cost you money. Dust built up on refrigerator coils can cause the appliance to run inefficiently (aka higher utility bills).
Apartment Guide gives a step-by- step guide on exactly how you find and clean those refrigerator coils while Marian at Miss Mustard Seed gives the low-down on how she cleans behind her stove.
Clean Inside of Appliances
The Penny Hoarder has a great detailed guide A Step-By-Step Guide to Cleaning Your Kitchen Appliances the Right Way on how to deep clean a variety of kitchen appliances worth taking a look.
And don’t forget to wipe the exteriors as well.
Wipe Cabinet Doors & Moldings
Grease and grime inevitably build up on kitchen cabinets after years of cooking splatters. Here’s 5 ways that different experts recommend cleaning wood kitchen cabinets to remove all that gunk. In that post, I tested these 5 different methods on my wood cabinets and found the best that worked for my kitchen cabinets. Then I worked through finding the best method to clean grime and fingerprints from my kitchen cabinet knobs and pulls.
Vacuum & Line Cabinet Drawers
After you have finished cleaning the outside of your cabinets, it’s time to get at the insides. Remove the dust, crumbs, and whatever else spilled with a vacuum (using the soft dusting brush attachment) followed by a wipe down using the same method used to wash the cabinet exteriors. To ensure the inside dries sufficiently, either keep the cabinet doors open for awhile to wipe any remaining moisture with another dry, soft cloth.
After vacuuming and cleaning the interior of the cabinets, decide whether you want to line cabinet shelves and drawers. Liners prevent newly washed dishes that may still be a bit wet from warping the shelf (c’mon, we all do it!) But this step is optional. And in all honesty, I only lined under my kitchen sink and the shelf with the pots and pans. I know I should line all my shelves, but I just haven’t.
Freshen Garbage Disposal
If the last homeowner didn’t upkeep their garbage disposal, there are probably some putrid smells coming up from your kitchen sink. Hunker gives ideas was how to keep your garbage disposal clean, fresh and sanitized. Not only will the citrus in the lemon help remove particles that can clog and muck up a disposal, but it will leave your sink and disposal smelling lemony fresh.
(As an aside, we recently replaced our garbage disposal. If you have never replaced one before, you might want to read this one essential lesson we learned.)
3. All Rooms
Here’s a series of cleaning tasks to consider for every room, including the bathroom and kitchen, with a bunch of recommendations from the experts.
Wash Walls & Ceilings
Keep in mind that when you clean have gravity work with you, not against you. Start deep cleaning from the top and work your way to the bottom. Unfortunately, this task is tedious. Quite frankly, a thankless PIA. It might be tempting to skip, but don’t.
Personally, when I moved into my house I first dusted the ceiling, trim and walls using a broom covered with a towel or Swiffer (working my way downward). Then, using a lint free washcloth or sponge, I washed down the walls from top to bottom with warm soapy water or a general cleaning solution.
For my next house, I might use the techniques outlined by Mr. Maid in how to Wash Walls and Ceilings Perfectly instead.
If you have stains or blemishes on the wall (or stubborn fingerprints and smudges from kids), Melissa at Clean My Space has some great tips in this video – start around minute 1:45).
Clean Interior Doors
While I debating about lumping this task in with Washing Walls and Ceilings, I think that doors deserve their own section. Doors are commonly neglected during cleaning, but are frequently touched surfaces, and therefore deserve special attention to remove all that dirt and grime.
As further detailed in Cleaning Your Interior Doors, be sure to dust the top edge of the door frame and top of the door first. Trust me, dust is going to rain down upon you. Then give a good scrub to remove smudges and fingerprints. And don’t forget to sanitize and polish door hardware – from the doorknobs to the door hinges.
Clean Closets
And don’t forget to deep clean inside those closets! Chances are the last owners of your house did not clean out the tumbleweeds that gathered into the depths of the closets in your house.
Do you really want to put all your belongings in closet filled with years of someone else’s dirt and dust?? Get into the back corners and wipe all shelving units.
Wash Windows
It’s amazing how a clean window can change your view on a home. Clean windows allow more light to enter your home, uplift your spirits, and increase curb appeal.

Vacuum the window frame, sills, and screens. Then wash your windows quickly and effectively using these 25+ Best Tips for Washing Windows (Straight from the Experts) that will ensure that your windows will sparkle.
Clean Radiators
There area variety of radiators, so it’s hard to give specific advice on how to clean. But chances are your radiators have been severely neglected and need a good deep cleaning.

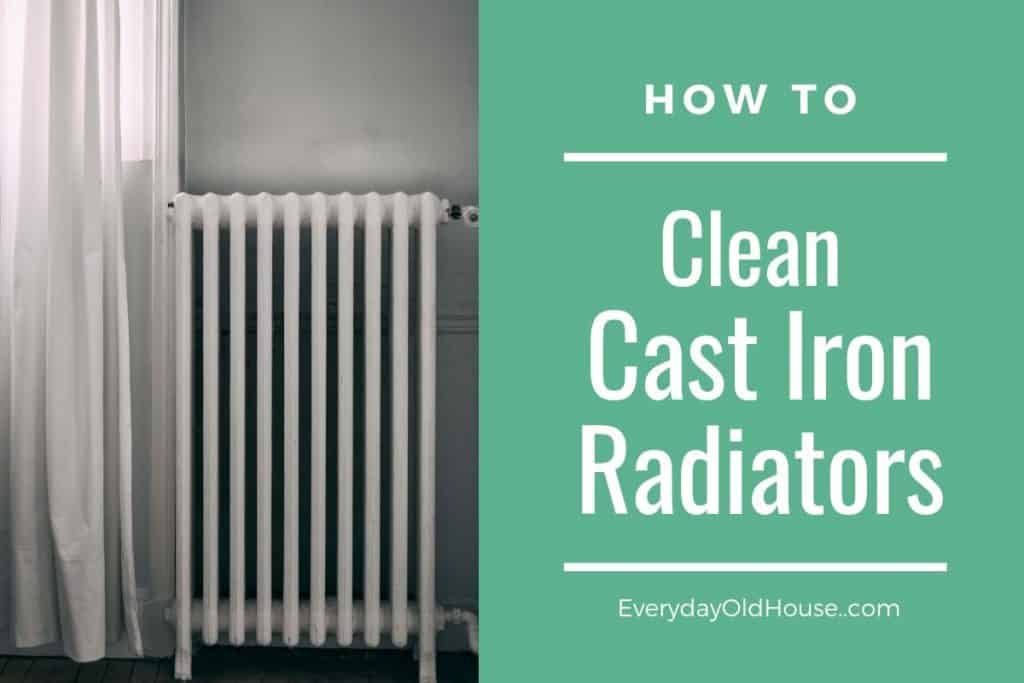
We have the old cast iron-type radiators in our house. And they were disgusting when we moved in. Not only was there inches of dust inside the radiator fins, I was amazed at what I found underneath and behind these radiators – sunglasses, papers, and even a small coffee can?!?!? It took awhile, but eventually I figured out the best and most efficient way to Clean Cast Iron Radiators.
Set Traps
If you don’t think you have an ant or rodent problem, this is optional. BUT when we moved into our current home, we had a big rodent issue. Interestingly enough, our home wasn’t abandoned or empty when we moved in (kind of creepy, huh?). There was a huge hole in the bottom of the wooden door to our unfinished basement.
We set out a handful of bait traps with expecting it to last a few days but it only lasted one night! Our basement was inhabited by either a very large rodent or a whole family of small ones! In case you are curious, the next day, we replaced the door ASAP!.
4. Utility Spaces
Clean Out Dryer Vent
This cleaning checklist task is ESSENTIAL. Why? Approximately 2,900 home clothing dryers occur every year, and 34% of these fires is caused by failure to clean the dryer. (As an aside make sure you buy a fire extinguisher for your new home!)
There are two places where lint can accumulate. The first is the obvious link clean out usually near the dryer door. But don’t forget the dryer exhaust vent. Blockage in dryer exhaust vents also can occur from the nests of small birds or other animals or from damages to the venting system itself. A compromised vent will not exhaust properly to the outside. And as a result, overheating may occur and a fire may ensue. ACE Hardware has a video on how to find and clean out you dryer exhaust vent.
5. Outside Spaces
Clean Gutters
Rain gutters do more than pull water away from your gardens and protect your home’s landscaping and siding. Gutters clogged with leaves, sticks and other debris can cause damage to your roof as well as your home’s foundations. And fixing those can be costly. a leaky roof or water damage to the interior or exterior of your home. Plus clogged gutters make cozy homes for birds, rodents and other pests.
I personally have never cleaned our home’s gutters. I’m a bit scared of heights. And I’m a bit of a clutz, so I make a habit of not climbing too high on ladders. But if you are more balanced and want to clean your gutters yourself, Family Handyman shows how to the right way to Clean Your Gutters in 6 Easy Steps.
Hose & Scrub Outdoor Living Spaces
With a new house, the condition of the exterior of your home is the first impression on your guests. Before you settle and throw that housewarming party, make sure the outdoor areas such s patios, walkways and decks are scrubbed clean.
Outdoor spaces endure a lot of abuse from the elements and from personal use. There’s a variety of types of patios, walkways and decks, so make sure you do research on the best ways to clean your outdoor space. Here’s a few of my favorites:
- Concrete: The Spruce has tips on How to Clean a Concrete Patio with a homemade cleaning solution as well as tricks on how to remove rust and mildew stains.
- Wood: Bob Villa has a technique that doesn’t require a power washer to brighten up your wood deck or patio
- Brick: Based on a review of a few websites (this one seemed to have the most detailed instructions) brick patios are best cleaned using a power washer.
Good luck with the cleaning. And CONGRATS on your “new” old house!
What’s Next?
Once you have tackled cleaning your new old house, be sure to move on to the highly recommended Creating Your Home Maintenance Plan for Your New Home! Protect your home and investment with this 4-step strategy to create a home maintenance plan that will identify, prioritize, and budget your to-do list so that you can create a happy and comfy home ASAP!
Related Posts
Want to be the first to know about new posts? Be sure to follow me on Pinterest, Facebook, Instagram or Twitter of even Etsy! Or better yet… Subscribe below!
My monthly (admittedly sometimes more, sometimes less….) emails are like receiving a unexpected letter from an old friend WITHOUT needing to put on your slippers and walk out to your mailbox…. See? I got ya, my friend!)
[Note: My posts are proudly connected to these amazing link parties full of DIY ideas and inspiration!]
Photo credits: Photo by rawpixel on Unsplash


