Last Updated on October 11, 2023
Restoring and refinishing vintage items can be a rewarding hobby. But if you are a newbie (like me), you are apt to make mistakes and become a cautionary tale. Like this weekend when I tried to clean tarnished hardware on a vintage suitcase and it all went wrong. To avoid making the same mistake as me, here’s 7 things you need to know about cleaning brass vs brass plated hardware.
This post contains affiliate links, including but not limited to, Amazon Associates. As such, I earn from qualifying purchases. Full disclosure located here.
Backstory
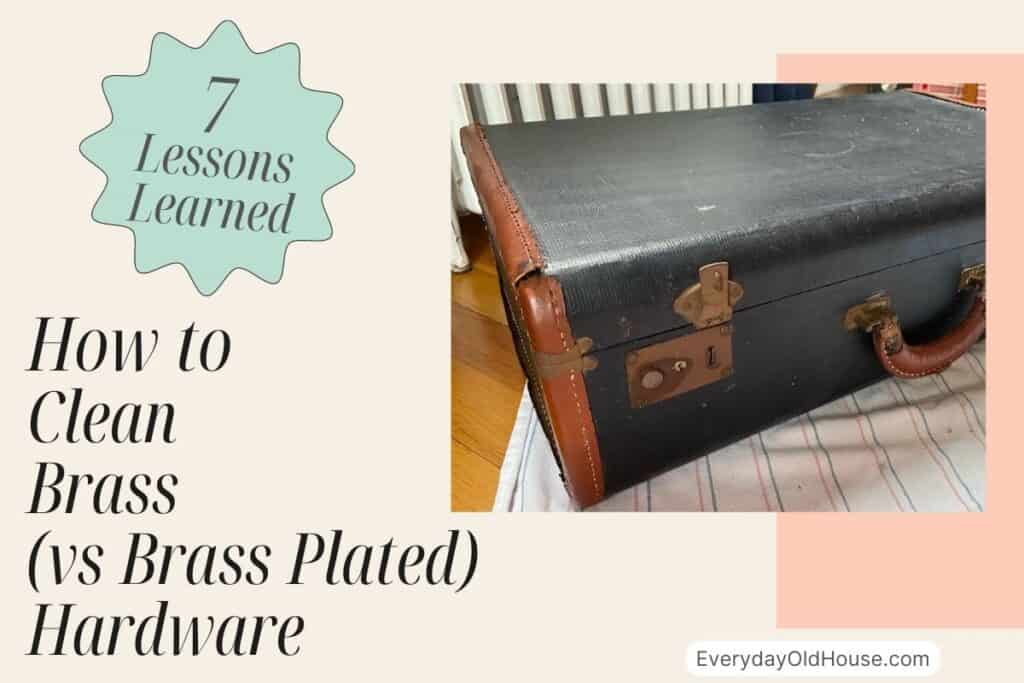
Recently I picked up a piece of vintage luggage for free from my local Facebook Buy Nothing Page. It was in great shape. Exterior had minimal wear and tear. Interior lining completely intact. Sure it smelled a tad musty and old, but nothing a box of baking soda couldn’t fix.
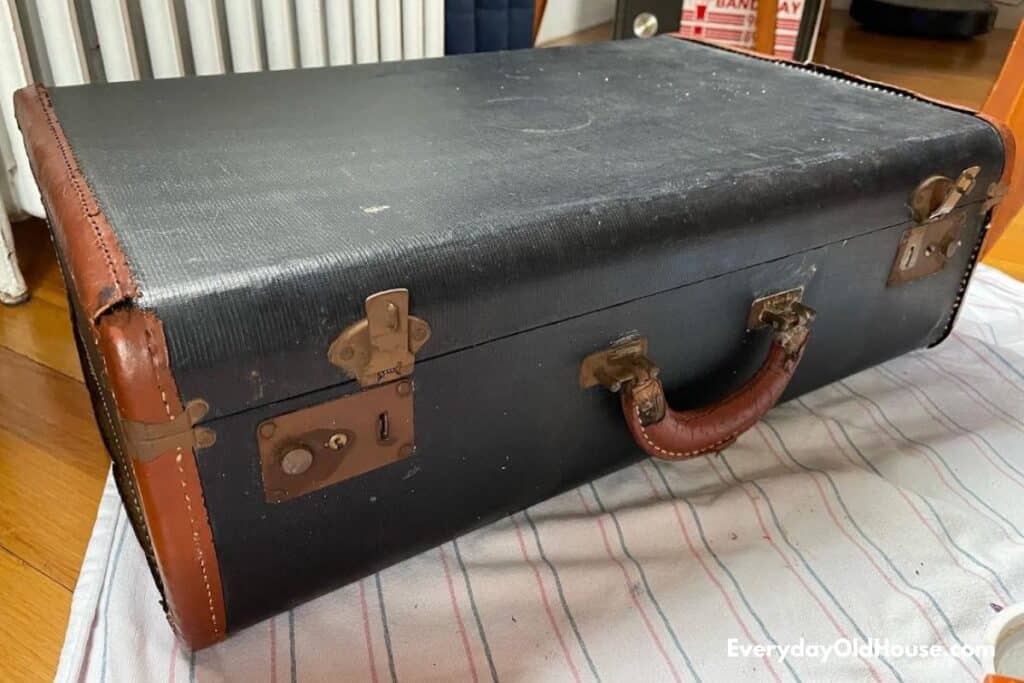
But the hardware on this vintage suitcase bothered me. It was tarnished and, well, looked dirty.
So I decided to try my hand at cleaning and polishing it. And honestly, it didn’t go well. I didn’t know the differences between solid brass and brass plated hardware.
I’ve learned a lot from this project. Next time a piece of tarnished hardware drops into my lap, I’ll be better prepared for success.
In the meantime, my hope is that you will learn from my experience and be in a better position when a piece of tarnished hardware comes your way.
Cleaning Brass vs Brass Plated Hardware
Here’s what I wish I knew before I tackled cleaning this vintage suitcase hardware.
1. What’s the Difference Between Brass and Brass Plated?
Solid brass is an alloy (aka mixture) of copper and brass. The combination of copper and zinc create a material prized for its durability, corrision-resistance, and classy appearance.
Meanwhile, plated brass items comprise a less-expensive metal base (commonly steel) coated with a thin layer of brass. And as you can guess, brass plating was invented by manufacturers as a cost-effective alternative to solid brass. It still provides a beautiful finish and appearance, but at a lower cost.
And looking back at my vintage suitcase, I probably should have known the hardware would be brass plated. Why? The suitcase has a solid carboard base (versus leather or expensive material). So why would a manufacturer use expensive brass hardware on a cardboard suitcase?
2. How to Tell the Difference Between Brass and Brass Plated Hardware
The easiest way to tell the difference between brass and brass plated is to hold a magnet to the item. Why?
- Brass is NOT magnetic. If the magnet doesn’t stick, then it’s solid brass.
- Brass plated is magnetic (due to the metal underneath). If the magnet sticks, then it’s brass plated.
Unfortunately, I didn’t know about this test until AFTER I had attempted some of the DIY brass cleaners mentioned below. And I ruined the hardware. Sigh…..
Well, lesson learned. You MUST first determine whether you working with solid brass or a brass-plated hardware because it impacts how you clean it.
3. Cleaning Brass vs Brass Plated Hardware
Aesthetically, the difference between solid brass and brass plated items isn’t significant. They look very similar. But cleaning and polishing these two are very different….
It is ESSENTIAL that you know if your item is brass or brass-plated. Otherwise you could ruin brass-plated hardware.
Here’s the best ways to clean and polish 1) solid brass versus 2) plated brass….
How to Clean Brass Hardware
Brass is extremely durable. With a bit of maintenance, it will look new for hundreds of years.
Like vintage furniture, the best way to clean away the years of grime and dirt is to first start with the least intrusive method – by washing with warm sudsy water (preferably Dawn) and a microfiber cloth. It’s amazing what a little soap can do to refresh brass.
However, for heavily tarnished brass, additional cleaning and polishing is usually needed. Luckily, there are several ways to refresh brass.
There are a variety of commercial products – like Brasso and Bar Keepers Friend – that aren’t expensive and can polish in a jiffy. Since I had Bar Keepers Friend in my stash of cleaning products (to clean my kitchen porcelain sink) I tried it out on my luggage hardware.
But you don’t need to run out to the store to buy a commercial product. You probably already have what you need to polish brass right in your kitchen cabinets. Here’s a few DIY cleaner options:
1. Lemon and Baking Soda
Squeeze the juice of half a lemon with baking soda until it turns into a paste. Apply a thin layer of paste with a soft cloth, and let it sit for a set time. Personally, I checked the piece every 10 minutes, and ultimately removed the paste 30 minutes later. Wash away the paste with warm sudsy water and dry.
2. Flour, salt, and white vinegar
Create a paste by combining equal parts of all three ingredients. Apply paste with a soft cloth and let sit for a designated time. Like the above method, wash with warm sudsy water and dry.
3. Ketchup
Apparently ketchup is for more than just accompanying your McDonalds French fries… Tomatoes contain an acid that removed tarnish on brass and other metals.
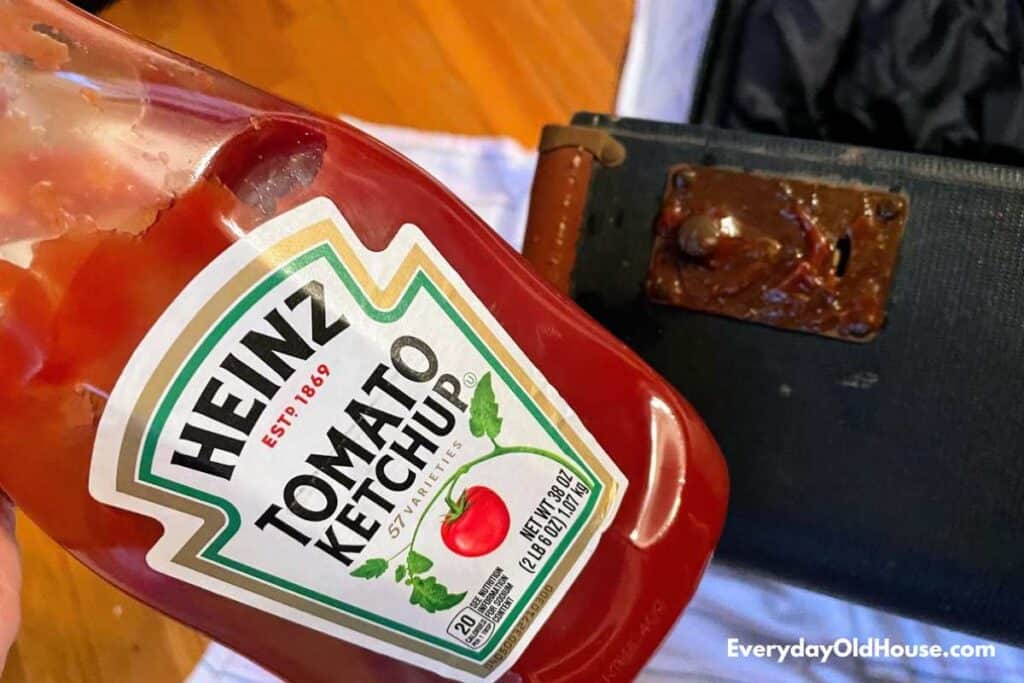
Apply a layer of ketchup on the brass hardware and let it sit for a period of time (I did 30 minutes). Wash with warm sudsy water and let it dry.
How to Clean Brass Plated Hardware
Unlike solid brass, brass plated hardware is NOT as easy to restore and bring back to its full grandeur.
As previously mentioned, plated brass hardware comprises just a thin brass coating over a cheaper metal. And often, a topcoat of lacquer is applied on top to protect the brass plating.
Unfortunately, over the years due to wear and tear, that lacquer and brass plating cracks or is scratched off.
Plated Brass Without Laquer
If the plated brass hardware doesn’t have a lacquer coating, you can gently wipe with ammonia or a mild brass cleaner and a light wash with warm sudsy water. But go gently – don’t clean too aggressively or you might remove the plated brass. And if you venture into the homemade cleaners above, do NOT let them stay on for a long period.
Plated Brass With Laquer
If the brass plated has a lacquer and it’s in working condition, then your best choice is washing with warm sudsy water and letting it be.
But if the lacquer is cracked (you will see black spots on the hardware), and really want to restore the hardware, you may need to completely remove the lacquer. This can be achieved by either by using a lacquer thinner or the boiling the hardware.
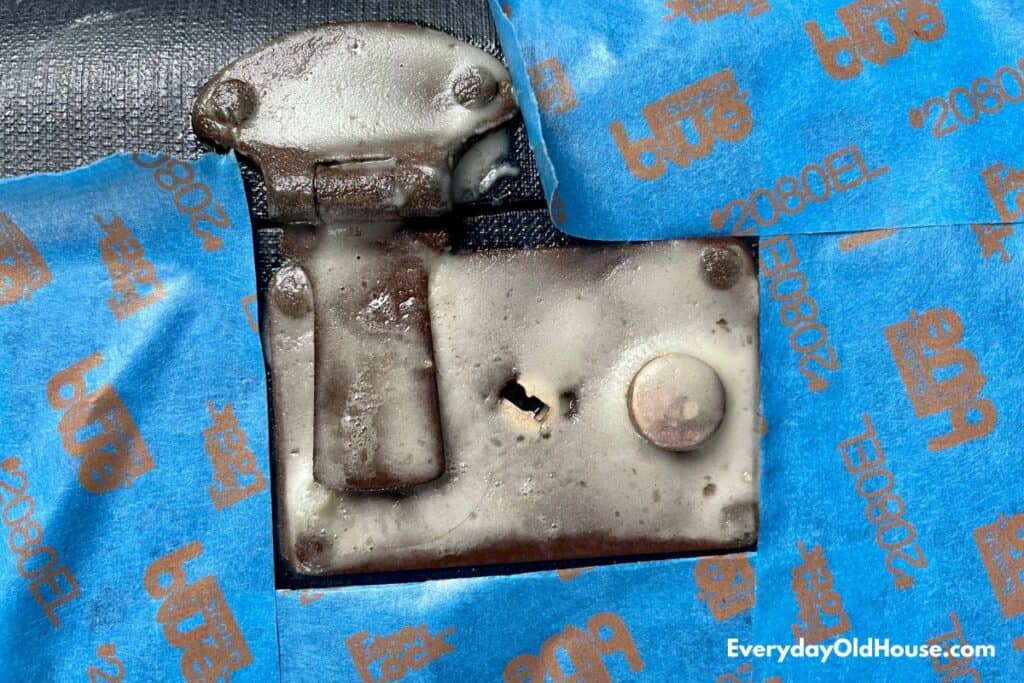
Looking at my hardware after trying a few methods (lemon juice, baking soda and Bar Keepers Friend) I damaged my brass plated hardware. I believe I removed the lacquer AND brass plating AND exposed the metal underneath.
Whoops.
4. Hardware Can Be BOTH Brass and Brass Plated Parts
As you can see from the photo below, I was surprised to find that some components of this suitcase’s hardware cleaned up nicely and some didn’t.
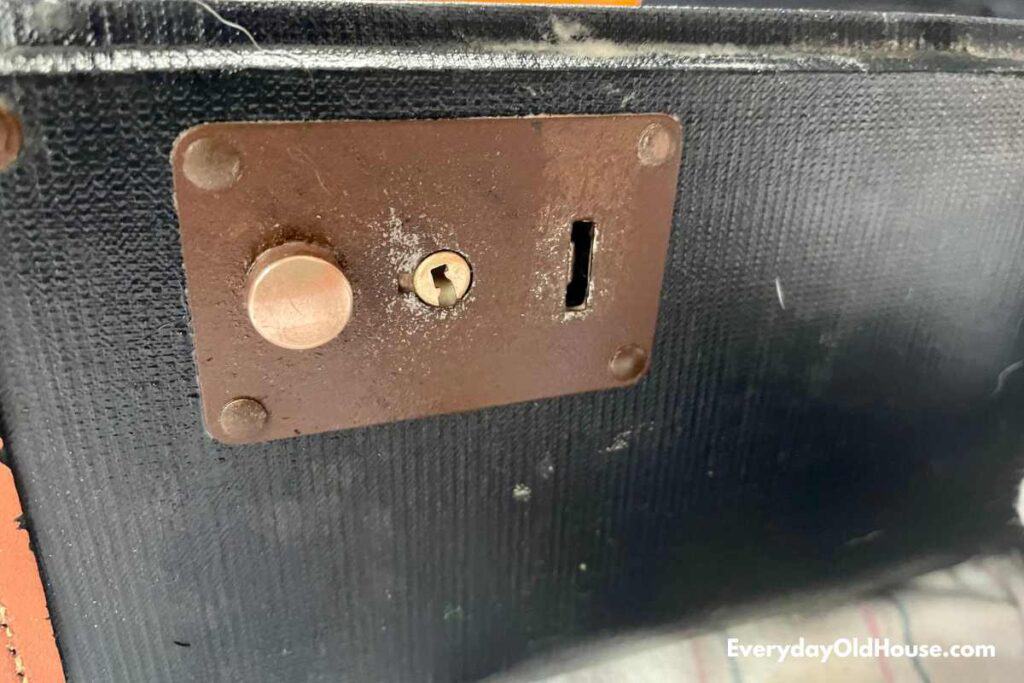
Apparently parts of my vintage suitcase are made from brass, such as the screw and the button latch (probably not the technical term for it, but you know what I mean). But the remainder of the hardware looks worse than when I started.
In the future, it’s important that I recognize that hardware could be a mixture of brass AND brass plated. Next time, I’ll use a magnet on ALL parts of the hardware to see which is brass and which is brass plated.
5. Patience Young Skywalker (But Not Too Much)
Tarnish and patina take years to build up on hardware. So why do we think that we can remove it within minutes?
If you decide to clean brass hardware using a homemade/ DIY cleaner, understand that you might need some patience. These cleaners may need some time to work their magic.
But, don’t let it sit too long and dry out, or damage the hardware.
(I know, I know, sounds a bit like Goldilocks and the 3 Bears…not too little, not too much…)
My lesson here was this. For the parts of my suitcase’s hardware that was truly 100% brass, the tarnish didn’t instantly disappear. I needed to try different methods and give them time to work.
In fact, it took cleaning brass vs brass plated with a few different DIY methods (ketchup, followed baking soda and lemon) and letting it sit 20 minutes before I noticed the button latch starting to turn color and shining again.
6. Be Willing to Take a Risk
Cleaning and restoring vintage items are a gamble, especially for newbies like myself. While there is a chance you might restore it back to its former glory, there is a bigger chance you could actually damage the piece.
Mistakes happen (have you read about my diaster with Citristrip?). And you might not be able to fix those mistakes and permanently damage an item.
Before starting any restoration or refinishing project, gauge your reaction by asking yourself this question. How you would feel if you ruined the item?
For me, I’m willing to take the risk on items that have no sentimental value to me. I’m ready to experiment with items that were on their way to a landfill (like this vintage suitcase).
Experimenting is the only way I’m going to learn so in the future when that sentimental or expensive antique falls into my lap, I will have the know-how to properly restore it.
7. Embrace the Imperfections
Over the years, vintage items show signs of wear and tear, and develop imperfections.
And while sometimes you should take a risk and try to restore or refurbish vintage items, sometimes is also OK to leave well-enough alone. Instead of fixing, it’s acceptable to embrace its natural patina and imperfections.
Or perhaps if you attempted to fix or improve it and it didn’t quite work out as well as you hoped (guilty as charged with this hardware), accept the item as-is and move on.
It’s a bit like being a middle-aged person and accepting the wear and tears of an aging body, isn’t it? My body shows a few scars or tweaks that are a reminder of a fully-lived life – both my joys and trials experienced over the years.
Like our bodies and our houses, there’s a history, a story, in these items. Even if the story is “remember when I picked up that free vintage suitcase and tried to clean the hardware? That was a disaster, wasn’t it? ?♀️”
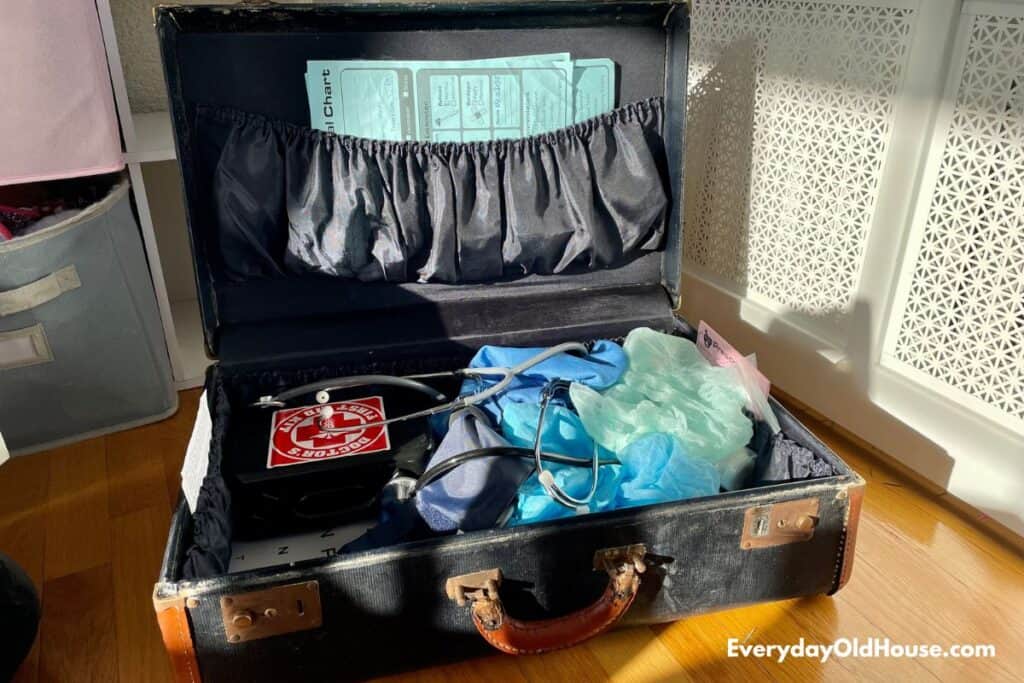
My next step is to determine a way to protect the hardware from further damage and/or rusting. But in the meantime, this little vintage piece is the perfect solution to hold doctor toys. My kids carry the suitcase around the house to set up their office and ensure all their stuffed animals get their checkups.
Related Posts

Want to be the first to know about new posts? Be sure to follow me on Pinterest, Facebook, Instagram or Twitter of even Etsy! Or better yet… Subscribe below!
My monthly (admittedly sometimes more, sometimes less….) emails are like receiving a unexpected letter from an old friend WITHOUT needing to put on your slippers and walk out to your mailbox…. See? I got ya, my friend!)
[Note: My posts are proudly connected to these amazing link parties full of DIY ideas and inspiration!]